


no sew wreath by amy!
Hi there! I'm Amy Hooper of HoopDeeDoo, and I have commandeered Skye's blog for the day!! We met on Twitter and decided to join forces to reach the world with extra-crafty joy!
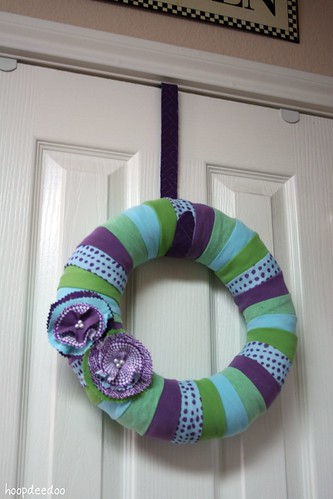
Today I am going to show you how to make an easy, cheap, and cute spring wreath out of stuff you may already have laying around the house. I spent a grand total of $5 on this project, only because I ran out of t-pins because I use so many.
What's even better is:
You do not need to know how to sew to do this project.
Yay! So don't let the fabric scare you. It's truly no-sew.
Here's what you'll need:
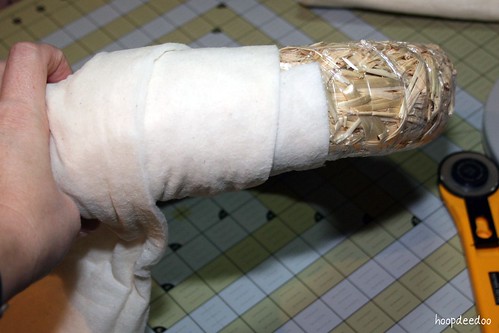
wreath form; straw (cheaper) or styrofoam (choose one that is not flat on the back)
batting scraps or old t-shirt scraps to cover straw wreath, about 1/4 yard for a 12 inch wreath
assorted fabrics (I used old t-shirts) about 1/2 yard total.
t-pins
pearl-head corsage pins
wreath hanger
Mod-Podge or other suitable glue
optional: pinking shears

1. Cut your batting/padding into 4" wide strips and wrap tightly around the wreath. Secure with t-pins to what will be the back of your wreath. Straw wreaths can be inconsistent in thickness; use extra padding to even out the skinny spots.
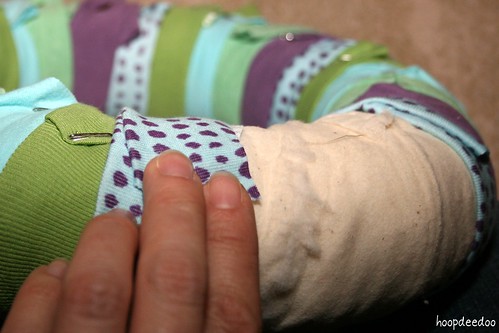
2. Cut your fabrics into 3" wide strips and fold in half. Cut them into strips long enough to just overlap behind the wreath. Now fold one in half lengthwise, wrap around the wreath, and pin in back. Continue with each strip, layering them over each other so all raw edges are hidden. When you get to the end, tuck under your first strip. (Note: If you are concerned about the back of the wreath showing or scratching, you can layer a strip of fabric over the back and hot glue it, to cover the pins.)
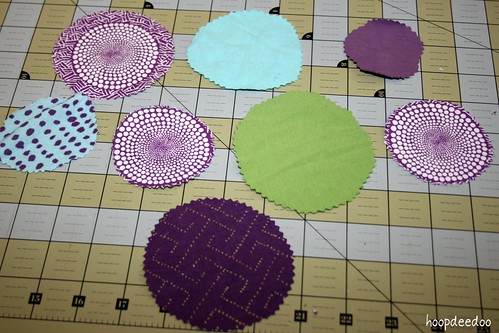
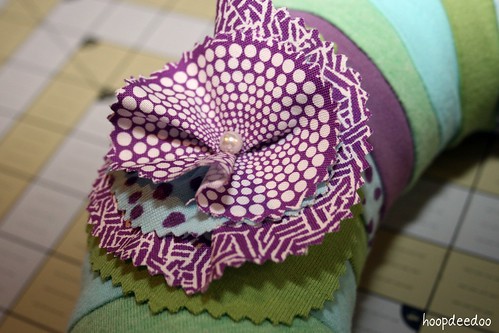
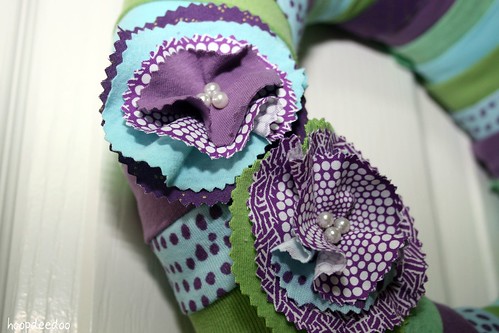
3. Let's add some flowers! With pinking shears if you have them, cut a bunch of differently sized circles out of your various fabrics. Decide which ones will layer together in each flower.
Pick up what will be the top layer of a flower, and pinch in the center.

Thread onto a corsage pin as shown, making sure to get the pin through the fold.
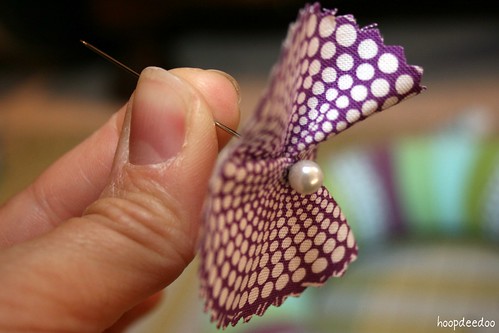
Repeat with each additional layer of the flower, and once finished, pin the whole thing directly onto the wreath. I added a couple more pins to each flower for security and cuteness.
4. Now obviously you could just hang this up and be done right now. But I had an ugly wreath hanger, and I was NOT going to spoil the cuteness with it. Here's an easy fix: cut strips of fabric the same width as the hanger, and glue on with a light coat of Mod Podge or something similar. Trim any ragged edges.
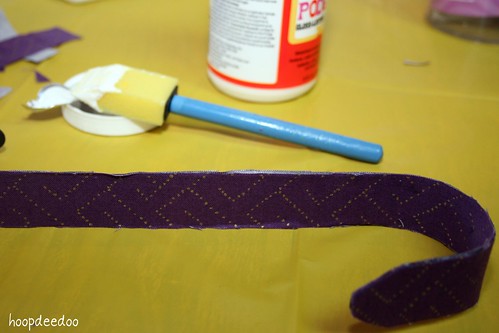
Doesn't have to be perfect. It's not like you're going to do a closeup photo for a blog post or anything... Seriously, though, no one will notice a few imperfections once it is hanging, but the overall color and look is much improved.
5. Hang and enjoy!!
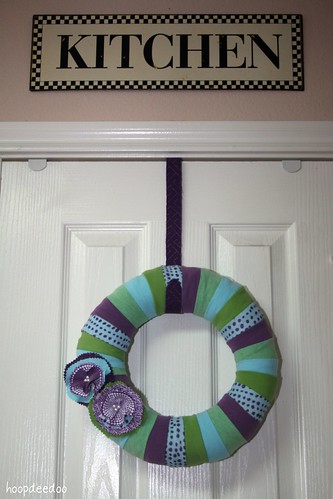
Think of how cute this would be as a housewarming gift, or in baby colors as a shower gift!
Mine is going to decorate the door to my 3 year-old's room, because she helped me make it. :) Her room didn't make the photo shoot because...well, a 3 year old tornado lives in that room. You get the idea.
You can find more tutorials and patterns over at my blog or in my Etsy shop! Come over and say hi! Or if you prefer Facebook, you can find me there too.
***************************************************
thank you so much amy for showing us this super cute tutorial! i can't wait to rip up some of my husbands old ratty tee shirts ahem... older clothes we don't wear any more and whip this up!
we will be linking up at the following blogs... come and join the party!!


ooooooh!!! I love this!!! LOVE THIS! :o)
ReplyDeleteI'm also your newest follower :o)
would love if you popped by to check me out!
http://itssewlisa.blogspot.com
So cute! Love the color combo!
ReplyDeleteAbsolutely adorable!! And I love that you recycled the fabrics from old clothes!! :)
ReplyDeleteOh wow, that is so cute! I never thought of using colorful t-shirt material for a wreath. I'll definitely be trying this soon.
ReplyDeleteThanks for sharing,
Tracy http://allthumbscrafts.blogspot.com
How CUTE is this!? I love the idea of using shirts. Filing this away in the "to do craft" list.
ReplyDeletehttp://itsybitsypaper.blogspot.com
What a beautiful wreath. Don't forget to join me for More The Merrier Monday and link up all of your great projects.
ReplyDeletehttp://diyhshp.blogspot.com
Hi! I love how colorful this is! I noticed that there is a spring decor party going on at Inspired by Charm. You should check it out. Here's the link http://www.inspiredbycharm.com/2011/03/welcome-to-my-little-party.html
ReplyDeleteCute idea! I love the color combinations. I think I'm going to have to make one! I'm now a follower and would love if you checked out my blog as well.
ReplyDeleteMelanie
youmadethat.blogspot.com
thanks for all of your kind comments, everyone!! I was AWOL over the weekend but tonight I am going to sit down and check out all of your blogs!! <3
ReplyDeleteAmy
LOVE this. Can't wait to make one.
ReplyDeleteThis is such a cute but yet easy project. I'm redoing my girls room and this would be an id love to add to the decor. Thanks
ReplyDeleteLove it!
[url=http://intranet2.lternet.edu/sites/intranet2.lternet.edu/files/ctools/]Cialis vs Viagra, Viagra online, Sildenafil[/url] - Cialis vs Viagra, Viagra online, Sildenafil
ReplyDelete