


a confession & hard labor {part one}
i've been cheating. i've been cheating on my diy blog and my diy-ing friends.
i have a friend named scott and the hotly pursued "diy bff" title has been bestowed upon him.
i know. if you could see me through your screen you would see my head hanging in shame. that is why i had to confess. however, there is a bright side.
i am here to share scott's diy prowess with you guys because i think you all rock! so if you could find it in your heart to forgive me i want to share a really cool tutorial with you. can you forgive me? please?
only for the tutorial?
it's ok. i get that. but i bet, after the tutorial, you will be willing to accept me back.
well, ok. along with the promise of more diy brilliance from scott in the future.
deal.
if you are into things like mixing concrete in the heat of the day, carrying a hundred pounds of wet concrete in a mold, and spraying highly acidic, melt-the-skin-off-your-face stain, all with the patience of a saint... then this project is definitely for you.
i was basically just along for the ride on this little manual-labor journey so i was only able to get pictures of some things.
what you will need:
scrap mdf, screws, tape measure, level and square to build your mold
tiles (if you desire) and hot glue (or some other silicone waterproof sealant)
quickrete and water to make the cement
rebar or chicken wire
smoothing and rounding tools for finishing
metal putty knive, goo gone and metal file
plastic sheeting, plastic gloves, stain and a sprayer
sealer

the first and definitely most important step is to measure the area you are making the countertop for. in his case, scott measured the area on each side of his grill in his custom built (by him) outdoor kitchen. then following those measurements exactly you build a mold to pour your concrete in.
make sure you measure length, width and depth and make the cuts for your mold accordingly. some tutorials say to use coated melamine particle board. in our case we just used what he had on hand, which was scrap mdf. it worked just fine. the only tip i definitley want to share is to predrill all your holes to keep the mdf, particle board, whatever you are using from splitting. such a headache!
scott has another countertop already made with a design from ceramic and marble tiles. so we created another version of that design, making sure that the design lay directly in the middle of the form. hot glue the tiles down with the smallest amount of hot glue necessary (you'll see why later)

once you get the tiles secured down, you need to seal all the edges or a couple of things might happen. for one, concrete will seep under the edges around your tiles and dry to the front of them. secondly, it will seep under the edges around the border and you will have a small ridge around the perimeter of your finished product. you can use hot glue, like we did, or you can use a waterproof silicone sealant
these are both easy fixes. you can use a metal putty knife to scrape any residue off the front of the tiles and you can use a metal file to smooth down the edges around the perimeter.
then, because we used the longest only screws we could find, we had to file down the screws flush to the surface so that later we could skim the extra concrete off the mold. and i was pretty excited because it made for a sweet picture!
ps - always wear protective gear. you can't see it but i promise scott is wearing safety glasses. i on the other hand was dodging sparks to get a picture. don't be me.
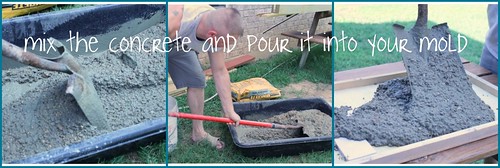
now comes the fun part! everyone get your back braces and work gloves and lets mix some concrete! the goal here is to not make it too wet or too dry.
i know. could i be more vague?
but seriously it depends on the weather, the humidity, the time of day and what size shoe you wear.
ok the shoe thing was a joke.
you want it to be beyond the "just-saturated-concrete-mix" but you don't want it sloshing around in your mixing pan. remember the golden rule of concrete solutions: you can always add more water, but you can't always add more concrete. so add a little water at a time until you get the consistency of somewhere between oatmeal and pancake batter... but don't be tempted to test this texture orally. just use your eyeballs.
then pour it into your mold, taking care to get it down in the corners. don't be shy.. fill 'er right up. we will be skimming the excess of the top in a minute.
at this point you insert the rebar or chicken wire into the wet concrete. this will reinforce it since it is quite a large piece and keep it from cracking or shattering when it is moved.
this step is mucho importante. do not skip it.
using those bright little noggins of yours, insert in your mind a picture of scott using a 2 x 4 to shimmy across the top of the mold and pushing the excess concrete off the top to level it. this is one of the parts where i actually helped and didn't have two hands to take pictures with and operate the 2 x 4.
once you have the mold filled and leveled, do this very important step that we skipped: take your orbital or pad sander and run it along the outside edges of your mold. this will shake the concrete and bring all the air pockets and bubbles to the surface so that you don't have tiny little divots on the top of your countertop.
or, do like we did and forget. and then call it character. whatever floats yer boat!
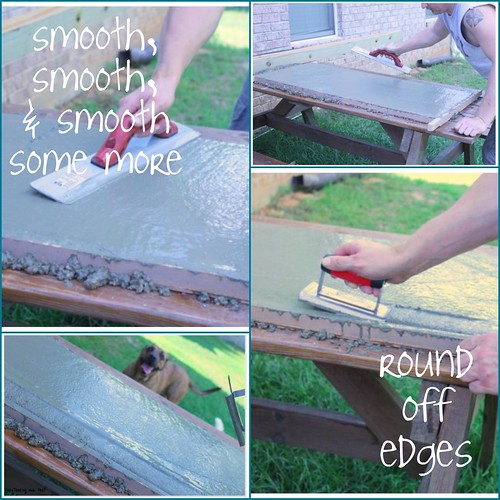
now comes the part where you have to have a light hand and some of the "patience of a saint" i mentioned before. using what i like to refer to as a smoothing tool (some sort of trowel? i bet the home depot people know exactly what it is called) make light passes over the surface of the concrete smoothing it out and removing small amounts of the mixture at a time until you have a surface you are happy with.
then take the rounding tool and run it around the edges, being sure to angle it up away from you and in about thirty degrees to pull the concrete away from the mold and give it a finished edge.
now you will see you have messed up your perfectly smooth surface, so go smooth it over again, using the same light hand as before.
this will need to be repeated a couple more times as the concrete hardens and each time it will hold the shape you give it a little better.
and now we wait. and wait. and wait. and then move it into the sun. and wait. and wait. and curse the louisianan humidity. and wait. (some more patience of a saint needed here)
eventually it will dry.and when it does, call upon your local muscles and ask them to help you lift it and turn it over very carefully. then take mold apart around the newly formed slab o'concrete and do a little giddy dance when it looks like what i thought it would.
or not. i mean, scott is cool. he doesn't mind if you do a giddy dance.
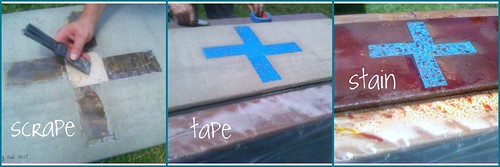
if you have tiles, now is the time to get your putty knife and scrape the hot glue dots off of them (hopefully it is just a couple of dots - remember i said to use the least amount absolutely necessary) and any concrete that has (and it will) seeped underneath and dried on them. don't worry if it looks scratched or gets cloudy. that is where the goo gone comes in. you need to make sure they are nice, clean and shiny before you tape them off for the concrete to be stained.
we used edgelock tape but whatever painter's tape you have will work fine. tape off the tiles and make sure you run a box knife or some sort of blade around the edges to push the tape down on to the sides and cover and possibly exposed tiles.
then fish out your hazmat suit. or your rubber gloves. put the concrete countertop on top of plastic sheeting. pour about a cup of the stain into your sprayer and spray a test pattern first in your newly released mold. once you find a happy medium between dripping the stain and full-force blast mode, spray the stain on the concrete. make sure to cover it with a light coat all over. you will be able to see "dead spots" (places where the stain didn't "take") quickly and you can spray over those again. you want it to be good and saturated but not pooling on the surface. once you have a nice even coat, bust out a glass of ice water and a movie and wait some more.
at this point in the process i had to leave and go to church with the hubs... but scott was kind enough to finish it and take pictures along the way. the slight problem is that i don't have the pictures yet... that is where the {part two} comes in... so stay tuned my friends!
No comments
Post a Comment